
In this article, we’ll talk about how @ConfigurationProperties annotation works and how you can transform any configuration to a Java Object.
1. What is @ConfigurationProperties
@ConfigurationProperties annotation, allows you to import any configuration that is located in application.properties and map it to a Java Object. Alternatively, you can use application.yml which enhances the readability of the configurations. Additionally, if you decide to have both application.properties and application.yml, the first one will have a higher priority than the second one. Finally, you can use this annotation at both class level and method level.
Now let’s take a look at the attributes of @ConfigurationProperties:
String value– The prefix of the configuration, e.g. if your class is named Config and has one String attribute named “name”, in the application.properties you must have a config like:anyname.name=Hello, while at the same time this attribute has the valueanyname.String prefix– This is an alias to the previous attributeboolean ignoreInvalidFields– This defaults to false and it indicates whether you want an error to be thrown if a field is invalid(e.g. you have an integer in the java class, but in the config, you have set a string value)boolean ignoreUnknownFields– This defaults to true and it indicates whether you want an error to be thrown if a field is unknown.
In the following sections, we will go through all the possible configs that you might have, ranging from primitives to Lists, Sets, and Maps of Objects. Note that we will use Java 16 Records instead of POJOs so that we skip all the boilerplate code. Finally, we’ll use the .yml instead of .properties to enhance the readability of our examples.
2. Setting Up the Project
First of all, you need to have Java installed, if you do not you can go through these tutorials depending on the OS your machine runs:
- Linux users: Install Java on Linux
- macOS users: Install Java on macOS
- Windows users: Install Java on Windows
For this tutorial, we are using the IntelliJ IDEA Community edition which you can download here.
If you are not using this IDE, you also need to download Maven here.
The next step is to visit Spring initializr and generate a project according to these settings shown in the image:
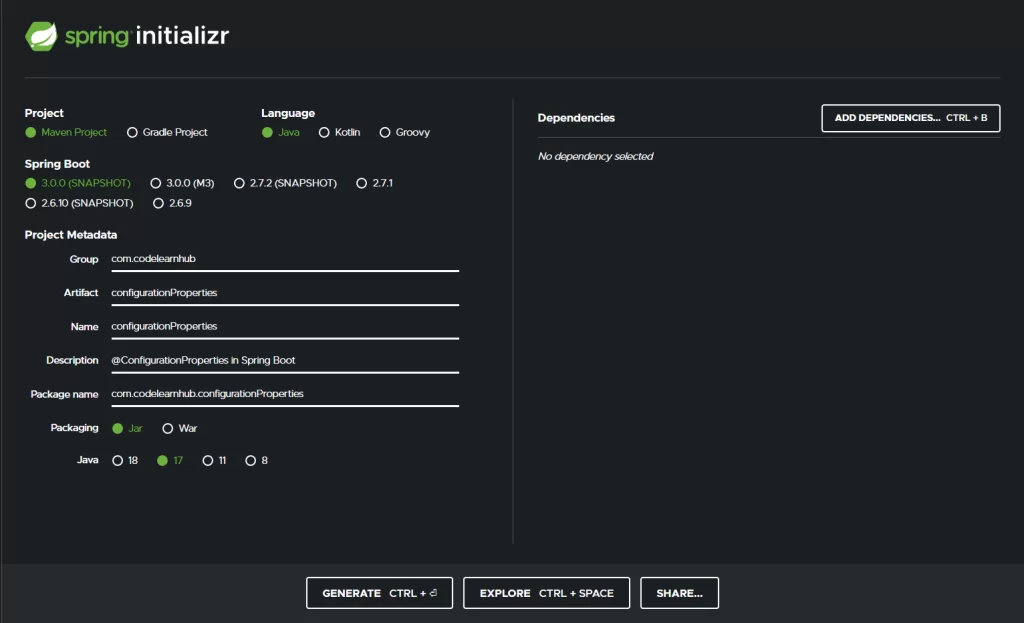
After having chosen the above options, press the GENERATE button, and a new spring boot project will be downloaded for you. Then you have to unzip the compressed archive and open the folder with your favorite IDE.
3. Using @ConfigurationProperties before Spring Boot 2.6
Before Spring Boot 2.6, you were obliged to declare your config class as a Bean by using @Configuration or @Component annotation if you want to use a POJO. However, if you use a record you can omit to declare it as a Bean.
So now head to pom.xml and change the following:
<parent>
	<groupId>org.springframework.boot</groupId>
	<artifactId>spring-boot-starter-parent</artifactId>
	<version>3.0.0-SNAPSHOT</version>
	<relativePath/> <!-- lookup parent from repository -->
</parent>
to have the version 2.5.14 and reload dependencies.
Now it’s time to create our Config class; this class should be named SimpleConfig which has only 2 attributes, int numberOfThreads and int timeout.
3.1 Using a POJO Config
The first option is to create a POJO as shown below:
package com.codelearnhub.configurationProperties.before;

import org.springframework.boot.context.properties.ConfigurationProperties;
import org.springframework.context.annotation.Configuration;
import java.util.Objects;

@Configuration
@ConfigurationProperties("api")
public class ConfigPojo {

    private int numberOfThreads;
    private int timeout;

   //setters, getters, equals, hashCode, toString
}
3.2 Using a Record Config
You can also use a record, but you need to define your record as follows:
package com.codelearnhub.configurationProperties.before;

import org.springframework.boot.context.properties.ConfigurationProperties;
import org.springframework.boot.context.properties.ConstructorBinding;

@ConfigurationProperties("api")
@ConstructorBinding
public record ConfigRecord(int numberOfThreads, int timeout) {}
As you can observe, we removed @Configuration so it won’t be declared as a Bean. Additionally, we added the @ConstructorBinding Annotation. This annotation indicates that these configuration properties will be loaded using the constructor instead of the setters. Finally, @ConstructorBinding cannot be used in conjunction with @Component, @Bean or @Import annotations.
The next step is to add the @ConfigurationPropertiesScan annotation to the class annotated with @SpringBootApplication. This is needed to enable the record we created, as we have not declared it as a Bean.
3.3 Filling the application.yml
The next step is to fill this object with the required values; to do that, rename the application.properties to application.yml and add the following:
api:
  numberOfThreads: 5
  timeout: 10
3.4 Create a class that uses the Config Class
The last step is to create a class that uses this config, like the following:
package com.codelearnhub.configurationProperties;

import com.codelearnhub.configurationProperties.before.ConfigRecord;
import org.springframework.stereotype.Component;

@Component
public class UseConfig {

    private final ConfigRecord config;

    public UseConfig(ConfigRecord config) {
        this.config = config;
        System.out.println(config.numberOfThreads());
        System.out.println(config.timeout());
    }

}
If you do run the application, you will get the following output:
2022-06-26 16:50:41.582  INFO 6796 --- [           main] c.c.c.ConfigurationPropertiesApplication : Starting ConfigurationPropertiesApplication using Java 17.0.1 on DESKTOP-I312L98 with PID 6796 (C:\Users\geoni\Downloads\configurationProperties\target\classes started by geoni in C:\Users\geoni\Downloads\configurationProperties)
2022-06-26 16:50:41.584  INFO 6796 --- [           main] c.c.c.ConfigurationPropertiesApplication : No active profile set, falling back to 1 default profile: "default"
5
10
2022-06-26 16:50:41.945  INFO 6796 --- [           main] c.c.c.ConfigurationPropertiesApplication : Started ConfigurationPropertiesApplication in 0.681 seconds (JVM running for 0.919)
4. Using @ConfigurationProperties after Spring Boot 2.6
First of all, go to pom.xml and change the version back to 3.0.0-SNAPSHOT
Since Spring Boot 2.6, we do not need the @ConstructorBinding annotation in the Config class. However, we still need to include the @ConfigurationPropertiesScan, as we want the Spring Context to scan for @ConfigurationProperties annotated classes.
4.1 Creating a Config Record With All Types of Attributes
In order to see how we can map any configuration that we might have, we will create this record:
package com.codelearnhub.configurationProperties.record;

import org.springframework.boot.context.properties.ConfigurationProperties;
import java.util.List;
import java.util.Map;

@ConfigurationProperties(prefix = "app")
public record Config(char c,
                     int i,
                     double d,
                     String str,
                     Person person,
                     String[] array,
                     List<Person> personList,
                     Map<String, Person> personMap
) {
    public record Person(String name, String surname){}
}
An important note here is that if you do want a specific implementation of an interface( e.g. you want the LinkedList implementation of List interface) you must declare the type in the Config class. For example, the default implementation of the personList above is ArrayList.
4.2 YAML Configuration for Primitives and Strings
To map YAML values to the values of the above record you just have to write the following:
app:
  c: H
  i: 5
  d: 5.7
  str: "Hello World"
Some notes here:
- For chars, “H”, ‘H’ and H are exactly the same
- For strings, you can surround them with double quotes or not. Also, you have to escape some characters like double-quotes.
4.3 YAML Configuration for Objects
For the Object Person the syntax is the following:
app:
  person:
    name: Georgios
    surname: Palaiologopoulos
4.4 YAML Configuration for Arrays, Lists, and Sets
As already stated, Arrays, Lists, and Sets are all the same at the .yml or .properties level. So to pass a list the syntax is the following:
app:
  array:
    - hello
    - big
    - world
  person-list:
    - name: Georgios
      surname: Palaiologopoulos
    - name: Dimitrios
      surname: Tasios
    - name: Ioannis
      surname: Makris
Note that snake-case and camelCase will both be valid, so if you change person-list to personList, it will still work.
4.5 YAML Configuration for Maps
When it comes to maps you should be very careful when choosing keys. Consider the example above:
app:
  person-map:
    "first person":
      name: Akis
      surname: Pal
    "second person":
      name: Ioannis
      surname: Makris
You would expect the map to have the following entries:
"first person" -> Person[name=Akis, surname=Pal]
"second person" -> Person[name=Ioannis, surname=Makris]
WRONG, for some reason Spring trims any spaces inside the keys of a map, so the real map would be:
"firstperson" -> Person[name=Akis, surname=Pal]
"secondperson" -> Person[name=Ioannis, surname=Makris]
One solution to this is to use the following syntax:
person-map:
  '[first person]':
    name: Akis
    surname: Pal
  '[second person]':
    name: Ioannis
    surname: Makris
Then the spaces would be preserved.
5. The application.properties Equivalent
If you do want to use the .properties file, the equivalent would be the following:
app.c=H
app.i=5
app.d=5.7
app.str="Hello World"
app.person.name=Georgios
app.person.surname=Palaiologopoulos
app.array[0]=hello
app.array[1]=big
app.array[2]=world
app.person-list[0].name=Georgios
app.person-list[0].surname=Palaiologopoulos
app.person-list[1].name=Dimitrios
app.person-list[1].surname=Tasios
app.person-list[2].name=Ioannis
app.person-list[2].surname=Makris
app.person-map.[first\ person].name=Akis
app.person-map.[first\ person].surname=Pal
app.person-map.[second\ person].name=Ioannis
app.person-map.[second\ person].surname=Makris
6. Using the ignoreInvalidFields Attribute of @ConfigurationProperties
You can try changing a value e.g. the double d attribute as follows:
app:
  d: hello
If you run the application now, you will get the following error:
Failed to bind properties under 'app.d' to double:

    Property: app.d
    Value: hello
    Origin: class path resource [application.yml] - 4:6
    Reason: failed to convert java.lang.String to double (caused by java.lang.NumberFormatException: For input string: "hello")
If we change the previous Config the ignoreInvalidFields to true as shown below:
@ConfigurationProperties(prefix = "app", ignoreInvalidFields = true)
and run the application, it will run without any problem and all invalid values will have the default values, for a double, it is 0.0, for an Object it would be null.
7. Using the ignoreUnknownFields Attribute of @ConfigurationProperties
This attribute default to false, and if you add another entry in the application.yml that does not exist in the Config class, you will not get an error. Let’s try adding another entry to the YAML:
app:
  test: will it crash?
Now run the application and you will see that no error will occur. The next step is to change this attribute and the:
@ConfigurationProperties(prefix = "app", ignoreUnknownFields = false)
If you do run the application, you will get the following:
Binding to target [Bindable@7bfc3126 type = com.codelearnhub.configurationProperties.record.Config, value = 'none', annotations = array<Annotation>[@org.springframework.boot.context.properties.ConfigurationProperties(ignoreInvalidFields=false, ignoreUnknownFields=false, prefix="app", value="app")]] failed:

    Property: app.test
    Value: will it crash?
    Origin: class path resource [application.yml] - 2:9
    Reason: The elements [app.test] were left unbound.
Consequently, this attribute would be useful if you want to keep your configuration file clean and not let it have unused properties.
8. Conclusion
By now, you should be able to import any configuration that you might want to use while knowing any problems that might occur and how to keep your properties file clean. You can find the source code on our GitHub page.