
In this article, we’ll go through what Spring Bean Annotation(@Bean) is, how you can use it and when you should use it.
1. What is @Bean in Spring
Spring @Bean annotation allows you to declare multiple beans in a @Configuration class, without the need to use class-level annotations such as @Component, @Service, etc. You can also declare beans in a @Component class which is also known as Bean Lite Mode and it is explained in detail in section 4 of this article.
Furthermore, @Bean annotation has 5 attributes:
- value – The name(s) that the bean will have. The default is the name of the
@Beanannotated method - name – This is exactly the same as
value - autowireCandidate – Defaults to true, specifies if other beans can autowire this bean
initMethod– The method to be called during the initialization of the beandestroyMethod– The method to be called when the application context closes
2. Spring @Bean vs Spring @Component
While both annotations lead to the creation of a Spring Bean, you should use them in different occasions:
Firstly, @Component is a class-level annotation while @Bean is a method-level annotation. Moreover, @Bean is used in methods of @Configuration classes in order to configure and create beans of classes that exist in external libraries, but @Component is used in our codebase to create new beans.
In the following sections, we’ll see how @Bean annotation works through detailed examples.
3. Setting Up the Project
First of all, you need to have Java installed, if you do not you can go through these tutorials depending on the OS your machine runs:
- Linux users: Install Java on Linux
- macOS users: Install Java on macOS
- Windows users: Install Java on Windows
For this tutorial, we are using the IntelliJ IDEA Community edition which you can download here.
If you are not using this IDE, you also need to download Maven here.
The next step is to visit Spring initializr and generate a project according to these settings shown in the image:
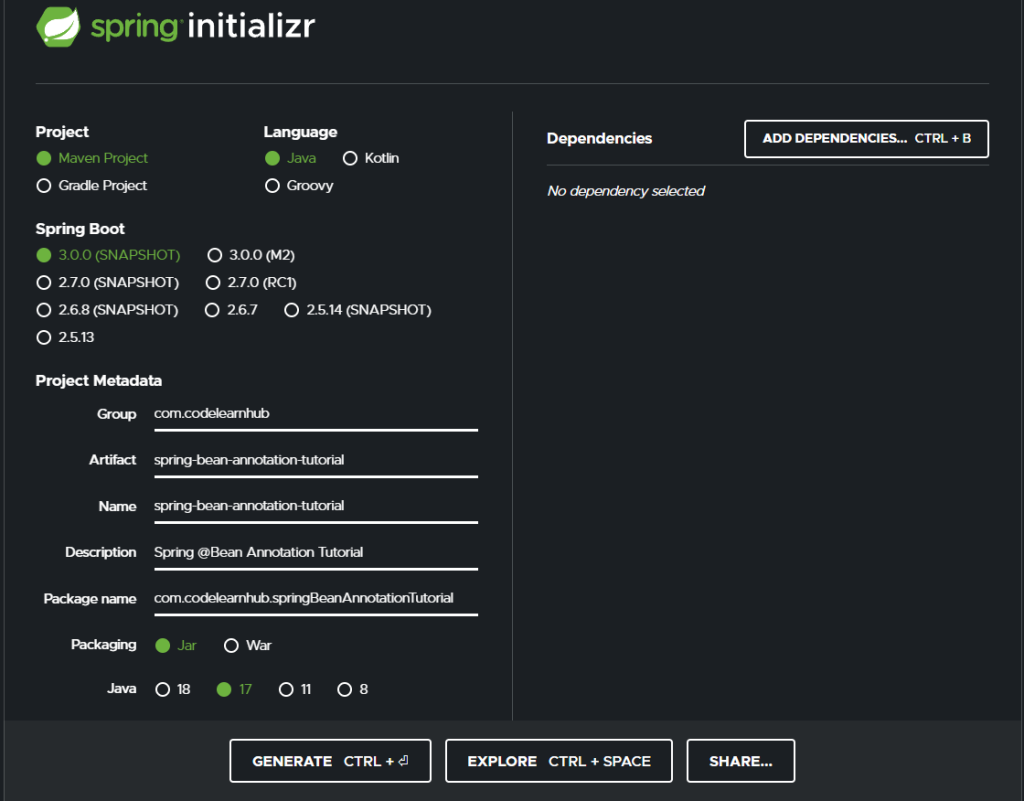
After having chosen the above options, press the GENERATE button, and a new spring boot project will be downloaded for you. Then you have to unzip the compressed archive and open the folder with your favorite IDE.
4. Creating a Class From External Libraries
Now, let’s say you have found a library that contains an API client for the API you want your application to use. This client could look like this:
package com.codelearnhub.springBeanAnnotationTutorial;

public class SomeApiClientFromALibrary {

    private String client_id;
    private String client_secret;
    private long timeout;

    public static class Builder {

        private String client_id;
        private String client_secret;
        private long timeout = 2000;

        public Builder() {
        }

        Builder(String client_id, String client_secret, long timeout) {
            this.client_id = client_id;
            this.client_secret = client_secret;
            this.timeout = timeout;
        }

        public Builder client_id(String client_id){
            this.client_id = client_id;
            return Builder.this;
        }

        public Builder client_secret(String client_secret){
            this.client_secret = client_secret;
            return Builder.this;
        }

        public Builder timeout(long timeout){
            this.timeout = timeout;
            return Builder.this;
        }


        public SomeApiClientFromALibrary build() {
            if(this.client_id == null){
                throw new NullPointerException("The property \"client_id\" is null.");
            }
            if(this.client_secret == null){
                throw new NullPointerException("The property \"client_secret\" is null.");
            }

            return new SomeApiClientFromALibrary(this);
        }
    }

    private SomeApiClientFromALibrary(Builder builder) {
        this.client_id = builder.client_id;
        this.client_secret = builder.client_secret;
        this.timeout = builder.timeout;
    }

    public void connectToAPI() {
        System.out.println("Connected Successfully");
    }

    public void closeAPIConnection() {
        System.out.println("Connection closed");
    }

}
As you can observe this class is not annotated with @Component, @Service, or any annotation that will lead to the inclusion of this class as a bean in the spring context. Furthermore, we cannot modify this class in order to have @Component or any other alias(such as @Service).
5. Creating a Spring Bean in the @Configuration class
If you do not know what @Configuration is and how it can be used, you can check this article. Now, let’s create our configuration class:
package com.codelearnhub.springBeanAnnotationTutorial;

import org.springframework.context.annotation.Bean;
import org.springframework.context.annotation.Configuration;

@Configuration
public class AConfig {

//  @Bean(name = {"API1", "API2"}) it is exactly the same
    @Bean(value = {"API1", "API2"})
    public SomeApiClientFromALibrary someClassFromLibrary(){
        return new SomeApiClientFromALibrary.Builder()
                .client_id("jkod88023434")
                .client_secret("*****")
                .timeout(5000)
                .build();
    }

}
Here we configured the bean from the external library and we gave two names to it; API1 and API2. Now we have the ability to inject it into a Service as shown below:
package com.codelearnhub.springBeanAnnotationTutorial;

import org.springframework.stereotype.Service;

@Service
public class AService {

    private final SomeApiClientFromALibrary someApiClientFromALibrary;

    public AService(SomeApiClientFromALibrary someApiClientFromALibrary) {
        this.someApiClientFromALibrary = someApiClientFromALibrary;
    }

}
As a result, we have successfully configured and injected a bean from an external library into our service.
If for any reason you need to create two beans of the same type, e.g. we add this method in the AConfig class:
@Bean(value = {"API3", "API4"})
public SomeApiClientFromALibrary someClassFromLibrary1(){
    return new SomeApiClientFromALibrary.Builder()
            .client_id("hfgjk894353")
            .client_secret("#####")
            .build();
}
And now if we do run our application, we will get this:
Parameter 0 of constructor in com.codelearnhub.springBeanAnnotationTutorial.AService required a single bean, but 2 were found:
	- API1: defined by method 'someClassFromLibrary' in class path resource [com/codelearnhub/springBeanAnnotationTutorial/AConfig.class]
	- API3: defined by method 'someClassFromLibrary1' in class path resource [com/codelearnhub/springBeanAnnotationTutorial/AConfig.class]
This means that when we tried to inject it into our service, it could not decide which of the two beans to inject. You can resolve this problem in 2 ways:
- By adding
@Primaryto the@Beanannotated method that we prefer - By adding
@Qualifierat the service as shown below:
public AService(@Qualifier("API3") SomeApiClientFromALibrary someApiClientFromALibrary) {
    this.someApiClientFromALibrary = someApiClientFromALibrary;
}
In this case, we injected the second bean.
6. autowiredCandidate attribute of Spring Bean Annotation
This attribute defaults to true, and that is the reason we could inject the bean into our service, if we set it to false, it would not allow us to autowire it and we would get this error:
The following candidates were found but could not be injected:
	- User-defined bean method 'someClassFromLibrary' in 'AConfig'
	- User-defined bean method 'someClassFromLibrary1' in 'AConfig'
You should set this attribute to false for beans that must be used as a dependency for other beans inside the same configuration class(such as here) and not outside the configuration class.
7. initMethod and destroyMethod Attributes of Spring Bean Annotation
@Bean annotation also allows you to specify a method to be called when the bean is initialized and a method when the application context closes. Now, head back to AConfig.java and change someClassFromLibrary1 to this:
@Bean(value = {"API3", "API4"}, initMethod = "connectToAPI", destroyMethod = "closeAPIConnection")
public SomeApiClientFromALibrary someClassFromLibrary1(){
    return new SomeApiClientFromALibrary.Builder()
            .client_id("hfgjk894353")
            .client_secret("#####")
            .build();
}
Now let’s start our app and check the logs:
2022-05-14T12:31:49.858+03:00  INFO 4672 --- [           main] .SpringBeanAnnotationTutorialApplication : Starting SpringBeanAnnotationTutorialApplication using Java 17.0.1 on DESKTOP-I312L98 with PID 4672
2022-05-14T12:31:49.860+03:00  INFO 4672 --- [           main] .SpringBeanAnnotationTutorialApplication : No active profile set, falling back to 1 default profile: "default"
Connected Successfully
2022-05-14T12:31:50.237+03:00  INFO 4672 --- [           main] .SpringBeanAnnotationTutorialApplication : Started SpringBeanAnnotationTutorialApplication in 0.633 seconds (process running for 0.874)
Connection closed
As you can observe, just before the application context starts, the method connectToAPI() is called and before the application context closes, the method closeAPIConnection() is called.
8. Conclusion
By now you should know what @Bean does, how, and when it should be used. You can find the source code on our GitHub page.