
In this article, we’ll go through how you can use Spring Boot Data JPA and annotations like @OneToOne, @OneToMany, and @ManyToMany to define the relations between that tables
1. Project Description
Imagine that we would like to have something like an e-banking app and that we have 3 Entities:
- The
BankUser, which is just the user of the App - The
Account, a classic bank account that can have an owner, a name, and an IBAN - The
Card, a classic debit 16-digit card with a CVV and an expiration date
Moreover, the following rules apply to the relations between them, for this e-banking app:
- A single user can have N accounts and an account can have many owners(Many to Many Relationship)
- A single user can have N cards, but a card should have only one owner(One to Many Relationship)
- A card should only be connected to one account(One to One Relationship).
- A card must always have an owner and always be connected to an account.
2. Setting Up the Project
First of all, you need to have Java installed, if you do not you can go through these tutorials depending on the OS your machine runs:
- Linux users: Install Java on Linux
- macOS users: Install Java on macOS
- Windows users: Install Java on Windows
For this tutorial, we are using the IntelliJ IDEA Community edition which you can download here.
If you are not using this IDE, you also need to download Maven here.
The next step is to visit Spring initializr and generate a project according to these settings shown in the image:
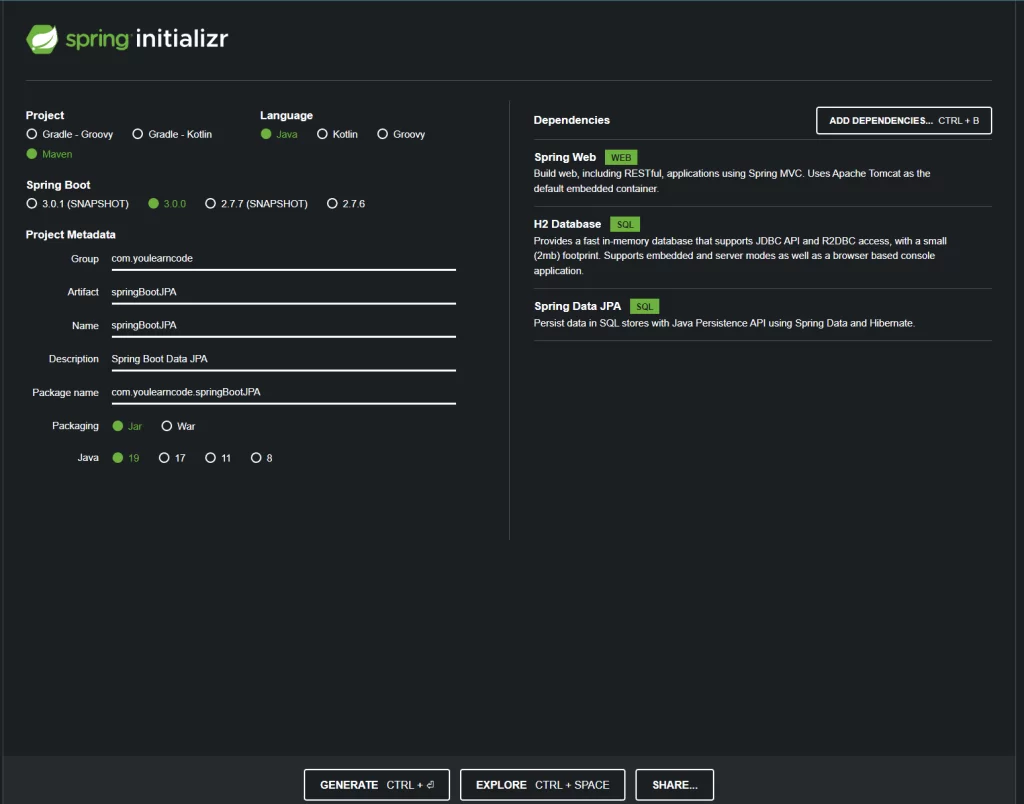
After having chosen the above options, press the GENERATE button, and a new spring boot project will be downloaded for you. Then you have to unzip the compressed archive and open the folder with your favorite IDE.
3. Creating the Entities
In this section, we will just create all the entities without any annotations of jakarta.persistence package
3.1 Account Entity
package com.youlearncode.springBootJPA.model;

import java.util.Objects;
import java.util.Set;

public class Account {

    private Long id;

    private String accountName;

    private AccountType accountType;

    private Set<BankUser> bankUsers;

    private Card card;

    private String IBAN;

    public Long getId() {
        return id;
    }

    public void setId(Long id) {
        this.id = id;
    }

    public String getAccountName() {
        return accountName;
    }

    public void setAccountName(String accountName) {
        this.accountName = accountName;
    }

    public AccountType getAccountType() {
        return accountType;
    }

    public void setAccountType(AccountType accountType) {
        this.accountType = accountType;
    }

    public Set<BankUser> getBankUsers() {
        return bankUsers;
    }

    public void setBankUsers(Set<BankUser> bankUsers) {
        this.bankUsers = bankUsers;
    }

    public Card getCard() {
        return card;
    }

    public void setCard(Card card) {
        this.card = card;
    }

    public String getIBAN() {
        return IBAN;
    }

    public void setIBAN(String IBAN) {
        this.IBAN = IBAN;
    }

    @Override
    public boolean equals(Object o) {

        if (this == o) return true;
        if (!(o instanceof Account)) return false;
        Account account = (Account) o;
        return Objects.equals(id, account.id) && Objects.equals(accountName, account.accountName) && accountType == account.accountType;
    }

    @Override
    public int hashCode() {
        return Objects.hash(id, accountName, accountType, IBAN);
    }
}
AccountType is just an Enum with 2 constants, SAVINGS and CHECKING.
3.2 BankUser Entity
package com.youlearncode.springBootJPA.model;

import java.util.HashSet;
import java.util.Objects;
import java.util.Set;


public class BankUser {

    private Long id;

    private String name;

    private String surname;

    private String taxId;

    private Set<Account> accounts = new HashSet<>();

    private Set<Card> cards = new HashSet<>();

    public Long getId() {
        return id;
    }

    public void setId(Long id) {
        this.id = id;
    }

    public String getName() {
        return name;
    }

    public void setName(String name) {
        this.name = name;
    }

    public String getSurname() {
        return surname;
    }

    public void setSurname(String surname) {
        this.surname = surname;
    }

    public String getTaxId() {
        return taxId;
    }

    public void setTaxId(String taxId) {
        this.taxId = taxId;
    }

    public Set<Account> getAccounts() {
        return accounts;
    }

    public void setAccounts(Set<Account> accounts) {
        this.accounts = accounts;
    }

    public Set<Card> getCards() {
        return cards;
    }

    public void setCards(Set<Card> cards) {
        this.cards = cards;
    }

    @Override
    public boolean equals(Object o) {
        if (this == o) return true;
        if (!(o instanceof BankUser)) return false;
        BankUser bankUser = (BankUser) o;
        return Objects.equals(id, bankUser.id) && Objects.equals(name, bankUser.name) && Objects.equals(surname, bankUser.surname) && Objects.equals(taxId, bankUser.taxId);
    }

    @Override
    public int hashCode() {
        return Objects.hash(id, name, surname, taxId);
    }
}
3.3 Card Entity
package com.youlearncode.springBootJPA.model;

import java.util.Objects;

public class Card {

    private Long id;

    private String number;

    private String cvv;

    private String expirationDate;

    private Account account;

    private BankUser bankUser;

    public Long getId() {
        return id;
    }

    public void setId(Long id) {
        this.id = id;
    }

    public String getNumber() {
        return number;
    }

    public void setNumber(String number) {
        this.number = number;
    }

    public String getCvv() {
        return cvv;
    }

    public void setCvv(String cvv) {
        this.cvv = cvv;
    }

    public String getExpirationDate() {
        return expirationDate;
    }

    public void setExpirationDate(String expirationDate) {
        this.expirationDate = expirationDate;
    }

    public Account getAccount() {
        return account;
    }

    public void setAccount(Account account) {
        this.account = account;
    }

    public BankUser getBankUser() {
        return bankUser;
    }

    public void setBankUser(BankUser bankUser) {
        this.bankUser = bankUser;
    }

    @Override
    public boolean equals(Object o) {
        if (this == o) return true;
        if (!(o instanceof Card)) return false;
        Card card = (Card) o;
        return Objects.equals(id, card.id) && Objects.equals(number, card.number) && Objects.equals(cvv, card.cvv) && Objects.equals(expirationDate, card.expirationDate);
    }

    @Override
    public int hashCode() {
        return Objects.hash(id, number, cvv, expirationDate);
    }
}
4. Defining The Tables and Their Relations with Spring Boot Data JPA
In this section, we will add annotations to the entities we created so will be able to insert, update and query the H2 Database without writing any SQL.
4.1 @Entity Annotation
With @Entity annotation, we mark a class as a table in the database; this annotation has only one attribute, name, that you can fill in case you’d like to override the name of the class(by default it will be uppercased).
So our classes will look like this:
@Entity
public class Account {

@Entity
public class BankUser {

@Entity
public class Card {
4.2 @Id and @GeneratedValue Annotations
The next step is to define the primary key of the table and the way that we will generate it.
To mark a field as a primary key, you must use the @Id annotation.
Moreover, by default the strategy is AUTO and the persistence provider will pick the appropriate database for the particular database. However, you can choose one of the following strategies:
- TABLE, the persistence provider should assign the primary keys for this entity, using an underlying database table
- SEQUENCE, the persistence provider should assign the primary keys for this entity, using a database sequence
- IDENTITY, the persistence provider should assign the primary keys for this entity, using a database identity column
- UUID, the persistence provider should assign the primary keys for this entity, by generating an RFC 4122 UUID
If none of the strategies suit your needs, you can define your own key generator by using @SequenceGenerator or @TableGenerator
4.3 @ManyToMany Annotation for the Account and BankUser Relationship
The @ManyToMany annotation has the following attributes all of which are optional:
targetEntity– The entity class that is the target of the associationcascade– Choose the cascade type of the operationsfetch– Choosing if the association will be eagerly or lazily loaded, defaults to LAZYmappedBy– Here we specify the field that owns the relationship, therefore, the entity that hasmappedBywill be the non-owning side
In our example, the owning side will be the BankUser entity, for which we have to add the following:
@ManyToMany
@JoinTable(name = "bank_user_account", joinColumns = @JoinColumn(name = "bank_user_id", foreignKey = @ForeignKey(name = "fk_bank_user_id_account")),
        inverseJoinColumns = @JoinColumn(name = "account_id", foreignKey = @ForeignKey(name = "fk_account_id_bank_user")))
private Set<Account> accounts = new HashSet<>();
The @ManyToMany is to specify that the relationship will be many-to-many.
Moreover, we have to specify some information about the table that will hold the connection between the two tables, by using the @JoinTable annotation.
In this case, we override the name of the table by specifying the name attribute, we specify the joinColumns(owning side) and the inverseJoinColumns(non-owning side)
With this in mind, we also specify the name of the column in the new table and the foreign key name by using the @JoinColumn and @ForeignKey annotations. Likewise, we do the same for the non-owning side.
To better understand the above, below you can find a diagram:

Different from the owning side, for the inverse side(Account class), we just have to specify the mappedBy as shown below:
@ManyToMany(mappedBy = "accounts")
private Set<BankUser> bankUsers;
4.4 @OneToMany and @ManyToOne Annotations for the BankUser and Card Entity
Now that we have understood how @ManyToMany works, it’s easier to grasp these two, as for the owning side we will provide the @OneToMany annotation and a join column as shown below:
@OneToMany
@JoinColumn(name = "bank_user_id", foreignKey = @ForeignKey(name = "fk_bank_user_id_cards"))
private Set<Card> cards = new HashSet<>();
and the diagram for this relationship will be the following:

However, in this case, the inverse side(Card entity) just needs the @ManyToOne annotation as shown below:
@ManyToOne(optional = false)
private BankUser bankUser;
Since a card must always have an owner, we will not allow any insertion without a specific owner, by setting optional = false.
4.5 @OneToOne Annotation for the Account and Card Relationship
Finally, for the one-to-one relationship between the account and card entity, we have to add the following to the owning side(Card):
@OneToOne(optional = false)
@JoinColumn(name = "account_id", foreignKey = @ForeignKey(name = "fk_account_id"))
private Account account;
Note that unless we add the attribute unique=true in @JoinColumn, cardinality will never be checked and we can end up with multiple cards being connected to an account. Moreover, since a card needs to be connected to exactly one account, we use optional = false just like before.
As for the non-owning side(Account) we just add the @OneToOne(mappedBy = "account"):
@OneToOne(mappedBy = "account")
private Card card;
Of course, the diagram for this relationship will be:

5. Creating the Repositories & Configuring H2 Database
Now to test that everything that we configured works as expected, we have to enable the H2 console and specify the datasource url by adding the following to application.yml:
spring.datasource.url=jdbc:h2:mem:testdb;DB_CLOSE_ON_EXIT=FALSE
spring.h2.console.enabled=true
The next step is to add a Repository for every entity by extending the CrudRepository interface:
AccountRepository.java:

package com.youlearncode.springBootJPA.repository;

import com.youlearncode.springBootJPA.model.Account;
import org.springframework.data.repository.CrudRepository;

public interface AccountRepository extends CrudRepository<Account, Long> {}

BankUserRepository.java:

package com.youlearncode.springBootJPA.repository;

import com.youlearncode.springBootJPA.model.BankUser;
import org.springframework.data.repository.CrudRepository;

public interface BankUserRepository extends CrudRepository<BankUser, Long> {}

CardRepository.java:

package com.youlearncode.springBootJPA.repository;

import com.youlearncode.springBootJPA.model.Card;
import org.springframework.data.repository.CrudRepository;

public interface CardRepository extends CrudRepository<Card, Long> {}
6. Creating a DataFiller class
As a final step, we will create a @Component annotated class that implements CommandLineRunner. This Functional Interface has just one method void run(String... args) that we will implement so as we add the following data:
- 2 Bank Users
- 3 Accounts
- The first one belongs to the first and second user
- The second one belongs only to the first user
- The third one belongs only to the second user
- 3 cards
- The first belongs to the first user and is connected to the first account
- The second belongs to the second user and is connected to the second account
- The last one belongs to the second user and is connected to the third account
As a result, the DataFiller class would look like this(We use the save method to insert or update the data):
package com.youlearncode.springBootJPA;
import com.youlearncode.springBootJPA.model.Account;
import com.youlearncode.springBootJPA.model.AccountType;
import com.youlearncode.springBootJPA.model.BankUser;
import com.youlearncode.springBootJPA.model.Card;
import com.youlearncode.springBootJPA.repository.AccountRepository;
import com.youlearncode.springBootJPA.repository.CardRepository;
import com.youlearncode.springBootJPA.repository.BankUserRepository;
import org.springframework.boot.CommandLineRunner;
import org.springframework.stereotype.Component;
import java.util.Set;
@Component
public class DataFiller implements CommandLineRunner {
private final BankUserRepository bankUserRepository;
private final CardRepository cardRepository;
private final AccountRepository accountRepository;
public DataFiller(BankUserRepository bankUserRepository,
CardRepository cardRepository,
AccountRepository accountRepository
) {
this.bankUserRepository = bankUserRepository;
this.cardRepository = cardRepository;
this.accountRepository = accountRepository;
}
@Override
public void run(String... args) throws Exception {
//Bank User 1
BankUser bankUser1 = new BankUser();
bankUser1.setName("Geo");
bankUser1.setSurname("Pal");
bankUser1.setTaxId("85030530");
bankUserRepository.save(bankUser1);
//Bank User 2
BankUser bankUser2 = new BankUser();
bankUser2.setName("Akis");
bankUser2.setSurname("Pal");
bankUser2.setTaxId("905803980");
bankUserRepository.save(bankUser2);
//Account 1
Account account1 = new Account();
account1.setAccountName("My Checking Account");
account1.setAccountType(AccountType.CHECKING);
account1.setIBAN("3452323259672453");
accountRepository.save(account1);
//Account 2
Account account2 = new Account();
account2.setAccountName("My Savings Account");
account2.setAccountType(AccountType.SAVINGS);
account2.setIBAN("5097436843736604");
accountRepository.save(account2);
//Account 3
Account account3 = new Account();
account3.setAccountName("Another Savings Account");
account3.setAccountType(AccountType.SAVINGS);
account3.setIBAN("3432847044115201");
accountRepository.save(account3);
//Users - accounts relationships
bankUser1.setAccounts(Set.of(account1, account2));
bankUser2.setAccounts(Set.of(account1, account3));
bankUserRepository.save(bankUser1);
bankUserRepository.save(bankUser2);
//First card
Card card1 = new Card();
card1.setNumber("4825386157071828");
card1.setCvv("991");
card1.setExpirationDate("11/27");
card1.setBankUser(bankUser1);
card1.setAccount(account1);
cardRepository.save(card1);
//Second card
Card card2 = new Card();
card2.setNumber("4702899117785600");
card2.setCvv("943");
card2.setExpirationDate("11/28");
card2.setBankUser(bankUser2);
card2.setAccount(account2);
cardRepository.save(card2);
//Third card
Card card3 = new Card();
card3.setNumber("0959313190380584");
card3.setCvv("745");
card3.setExpirationDate("11/28");
card3.setBankUser(bankUser2);
card3.setAccount(account3);
cardRepository.save(card3);
}
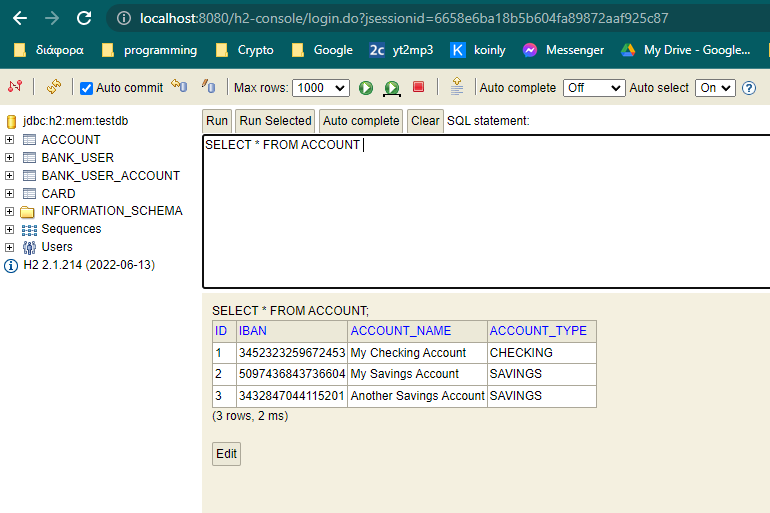
}7. Running the App & Inspecting the H2 Database
As a final step, start the app and visit http://localhost:8080/h2-console, the username is sa and just leave the password empty.
Account Table:
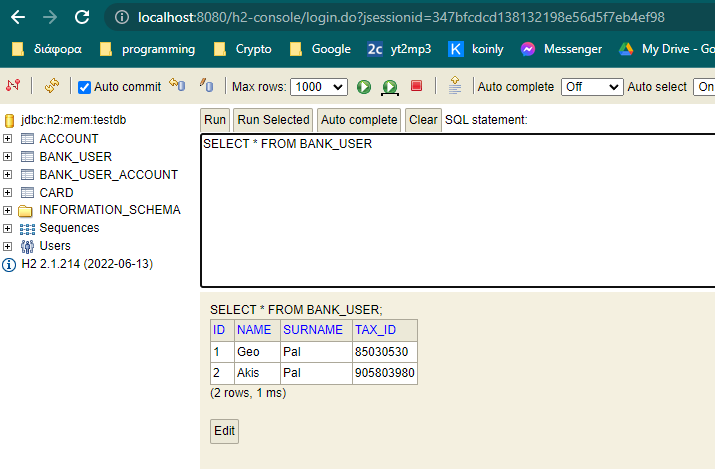
Bank User Table:
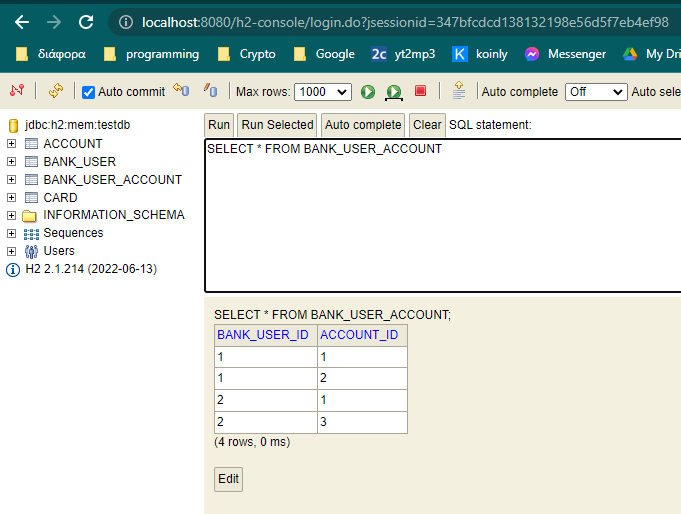
The table that holds the data for Many-to-many relationship between bank users and accounts:
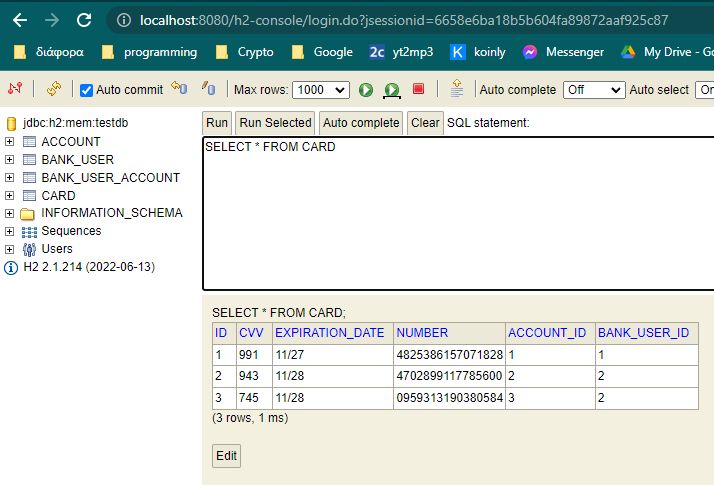
Card Table:
8. Retrieving the Users via BankUserRepository
We can try to retrieve all users by adding the following line in DataFiller.java:
Iterable<BankUser> userList = bankUserRepository.findAll();
However, you will notice that only the information from this table is retrieved since if you set a breakpoint after retrieving the users, you can see the following:
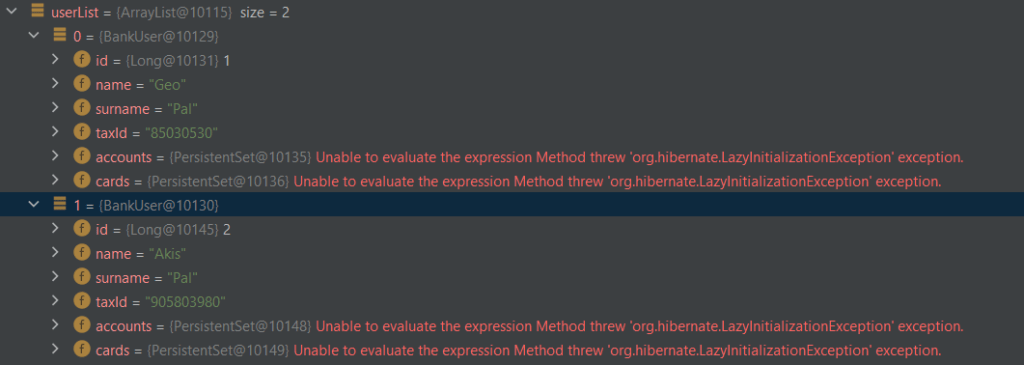
The LazyInitializationException will be thrown if we try to access the accounts or cards field of the user.
This happens because the default fetch type is Lazy. To actually be able to access for example the cards field, we can change the fetch type in BankUser entity as shown below:
@OneToMany(fetch = FetchType.EAGER)
@JoinColumn(name = "bank_user_id", foreignKey = @ForeignKey(name = "fk_bank_user_id_cards"))
private Set<Card> cards = new HashSet<>();
As a result, if we do re-run the app we can see that we will also get the info about the cards, however, this way of fetching the cards for each user will result in the N+1 problem since we would have to run N(one for each user in order to fetch their card) and 1(The query to fetch all the users) queries.
In order to resolve this issue, we can remove the EAGER fetch type, and use the @NamedEntityGraph annotation as shown below, in the BankUser class:
@Entity
@NamedEntityGraph(name = "BankUser.cards", attributeNodes = {
        @NamedAttributeNode("cards")
})
public class BankUser {
Then we have to create a method inside the BankUserRepository as shown below:
@Query("SELECT bu FROM BankUser bu")
@EntityGraph(value = "BankUser.cards")
List<BankUser> findAllWithCards();
And as a last step, we should call this method in the DataFiller class:
var bankUsersWithCards = bankUserRepository.findAllWithCards();
9. Conclusion
After reading this article, you will be able to use jakarta.persistence annotations such as @OneToMany, @JoinColumn, or@JoinTable in order to specify the relationships between the entities. You can find the source code on our GitHub page.