

In this article, we’ll go through what profiles are in Spring Boot and how you can use them in, in detailed examples.
1. What is a Profile in Spring Boot?
You can think of Spring Boot profiles as a way to choose which beans should get instantiated in the spring context, or what value should configurations have, depending on the profile that you have chosen.
There are many ways to enable a profile, with the most common being the @Profile("profile-name) annotation. In the next sections, we’ll go through each of the ways available to use profiles.
2. Setting Up the Project
First of all, you need to have Java installed, if you do not you can go through these tutorials depending on the OS your machine runs:
- Linux users: Install Java on Linux
- macOS users: Install Java on macOS
- Windows users: Install Java on Windows
For this tutorial, we are using the IntelliJ IDEA Community edition which you can download here.
If you are not using this IDE, you also need to download Maven here.
The next step is to visit Spring initializr and generate a project according to these settings shown in the image:
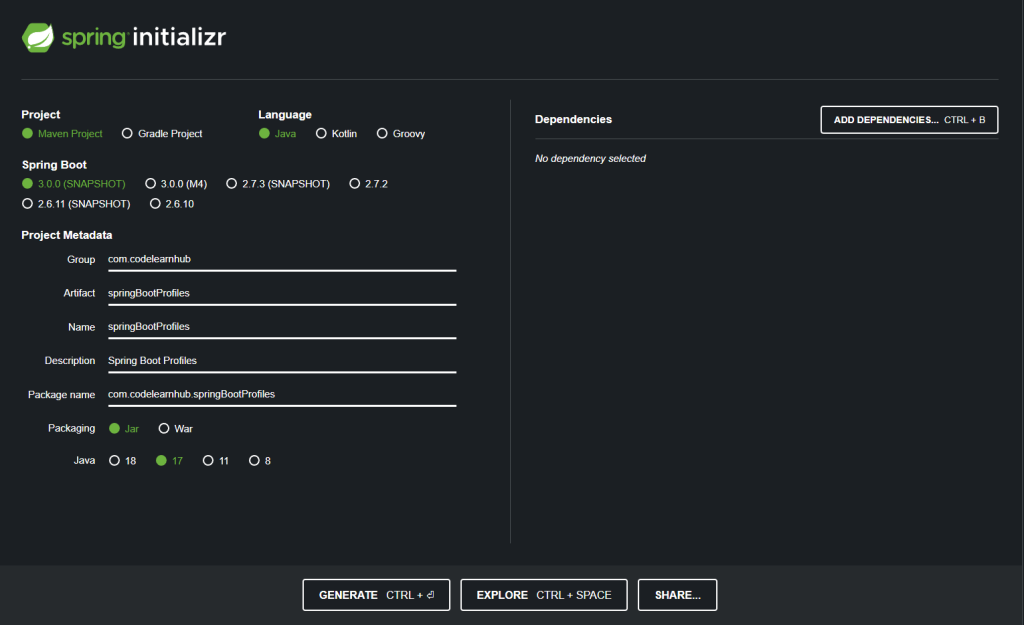
After having chosen the above options, press the GENERATE button, and a new spring boot project will be downloaded for you. Then you have to unzip the compressed archive and open the folder with your favorite IDE.
3. Using @Profile Annotation
@Profile annotation can be applied at class level or at method level and it should be used with any of the annotations used for creating a Bean at class level (@Component, @Service, @Repository, etc.) or at method level(@Bean annotation).
It has only one parameter, which accepts a list of profile names that will be connected with this bean.
3.1 Using @Profile Annotation at Class-Level
Let’s say that we have this simple component:
@Component
@Profile("dev")
public class SimpleComponent {

}
Now we can go back to the main class and try this:
@SpringBootApplication
public class SpringBootProfilesApplication {
	public static void main(String[] args) {
		var ctx = SpringApplication.run(SpringBootProfilesApplication.class, args);
		var bean = ctx.getBean("simpleComponent");
	}
}
We will get the following exception:
Exception in thread "main" org.springframework.beans.factory.NoSuchBeanDefinitionException:
No bean named 'simpleComponent' available
Why? Because we haven’t activated the profile “dev”. A simple way to activate it is to go to application.properties and add the following:
spring.profiles.active=dev
And if you do re-run the application no error will be thrown.
3.2 Using @Profile Annotation at Method-Level
Furthermore, you can @Profile with @Bean annotation which will both live under a @Configuration annotated class.
Create the following class:
@Configuration
public class SimpleConfiguration {
    @Bean
    @Profile("dev")
    public String stringBean(){
        return "CLH";
    }
}
For the next step, add this line in the main method:
var beanFromConfig = ctx.getBean("stringBean");If you run the program, as expected you will not get any errors.
3.3 Using @Profile Annotation to Exclude a Bean from a Profile
Note that you can also choose a profile in which you do not want a bean to be included by using the following syntax:
@Component
@Profile("!prod")
public class DevComponent {

}
As you can observe, this DevComponent will be included in all profiles but prod.
3.4 Multiple Profiles and Multiple Active Profiles
Finally, you can configure a bean to be connected with multiple profiles and of course, activate multiple profiles.
As an example, you might have a bean that you want to include only in the dev and test profile as shown below:
//In annotation
@Profile({"dev", "test"})
//In application.properties
spring.profiles.active=dev,test
4. How to Activate a Profile in Spring Boot
In this section, we’ll go through all the ways to activate a profile in Spring Boot
4.1 Using application.properties or application.yml
As we have already seen, you can activate a profile by using the following syntax:
application.properties:
spring.profiles.active=profile_1,profile_2,...,profile_n
application.yml:
spring:
  profiles:
    active:
      - profile_1
      - profile_2
      ...
      - profile_n
4.2 Using JVM Options
You can also use the JVM Options by first running mvn clean package to build your jar and then by running the following command:
java "-Dspring.profiles.active=profile_1,profile_2,...,profile_n" -jar jar_name.jar
4.3 Using Configurable Environment
You can also set the active profiles programmatically, but you need to change the main method as shown below:
package com.codelearnhub.springBootProfiles;
import org.springframework.boot.SpringApplication;
import org.springframework.boot.autoconfigure.SpringBootApplication;
import org.springframework.core.env.ConfigurableEnvironment;
import org.springframework.core.env.StandardEnvironment;
@SpringBootApplication
public class SpringBootProfilesApplication {
	public static void main(String[] args) {
		ConfigurableEnvironment environment = new StandardEnvironment();
		environment.setActiveProfiles("profile_1", "profile_2", ..., "profile_n");
		SpringApplication app = new SpringApplication(SpringBootProfilesApplication.class);
		app.setEnvironment(environment);
		app.run(args);
	}
}
The most important note here is that you must first set the environment and then run the SpringApplication or else the profiles will not be activated.
4.4 Setting Active Profiles in Tests Using @ActiveProfiles Annotation
You can set an active profile in tests by using @ActiveProfiles annotation which will enable a specific profile or profiles.
Below is an example that will output “test”:
package com.codelearnhub.springBootProfiles;
import org.junit.jupiter.api.Test;
import org.springframework.beans.factory.annotation.Autowired;
import org.springframework.boot.test.context.SpringBootTest;
import org.springframework.core.env.ConfigurableEnvironment;
import org.springframework.test.context.ActiveProfiles;
import java.util.Arrays;
@SpringBootTest
@ActiveProfiles("test")
class SpringBootProfilesApplicationTests {
	@Autowired
	ConfigurableEnvironment configurableEnvironment;
	@Test
	void contextLoads() {
		Arrays
			.stream(configurableEnvironment.getActiveProfiles())
			.forEach(System.out::println);
	}
}
@ActiveProfiles annotation, it has these attributes:
value– An array of strings which are the profile namesprofiles– The same as the valueresolver– This allows you to create your own profile resolver(we will see in a bit how)inheritProfiles– This defaults to true and if you leave it true, the profiles of a parent test will be passed down to the child tests
To create a custom resolver, you can create a class that implements the ActiveProfilesResolver interface as shown below:
package com.codelearnhub.springBootProfiles;
import org.springframework.test.context.ActiveProfilesResolver;
public class Resolver implements ActiveProfilesResolver {
    @Override
    public String[] resolve(Class<?> testClass) {
        return new String[]{"unit-tests", "integration-tests"};
    }
}
Of course, it would make sense to use a resolver if you need to apply some logic before setting the active profiles.
4.5 Setting Active Profiles through Maven
You can declare profiles inside the pom.xml and set which profiles will be active by default:
<profiles>
	<profile>
		<id>test</id>
		<properties>
			<spring.profiles.active>test</spring.profiles.active>
		</properties>
	</profile>
	<profile>
		<id>perf</id>
		<properties>
			<spring.profiles.active>perf</spring.profiles.active>
		</properties>
	</profile>
</profiles>
Then you can go to application.properties and add the following:
[email protected]@
But this is not enough since if you do run the app you will see the following in the logs:
2022-08-05T18:38:46.446+03:00 INFO 19340 --- [ main] c.c.s.SpringBootProfilesApplication : The following 1 profile is active: "@spring.profiles.active@"
You can remedy this in two ways:
- Add the following inside the one profile that you want to be activated:
<activation>
	<activeByDefault>true</activeByDefault>
</activation>
So if we do want to have the profile “perf” active, our pom would look like this:
<profiles>
	<profile>
		<id>test</id>
		<properties>
			<spring.profiles.active>test</spring.profiles.active>
		</properties>
	</profile>
	<profile>
		<id>perf</id>
                <activation>
	               <activeByDefault>true</activeByDefault>
                </activation>
		<properties>
			<spring.profiles.active>perf</spring.profiles.active>
		</properties>
	</profile>
</profiles>- Alternatively, you can remove the setting described above and run
mvn clean packageeither like this:
mvn clean package --activate-profiles test
Or like this:
mvn clean package -P test
5. How to Set Different Properties for Each Profile
There are two ways to set different properties for every profile.
5.1 Using One Properties File for Every Profile
The easiest way to do this is to add an application.properties or application.yml file with the following pattern:
application-{name-of-your-profile}.ymlNote that the values that you will define in such a file will override the values of the main application.yml. Let’s see an example:
Let’s say you would like to enable INFO logging level on the dev profile but DEBUG on the default:
First, you need to set this value in the application.yml file:
logging:
  level.org.springframework.web: INFO
and then you need to create a application-dev.yml file with this value:
logging:
  level.org.springframework.core: TRACE
Now you can try running the app without setting any profile and you will not see any TRACE logs.
However, if you run the app by let’s say running the following commands:
# build
mvn clean package
# run the app with dev profile active
java  "-Dspring.profiles.active=dev" -jar .\target\springBootProfiles-0.0.1-SNAPSHOT.
jar
You will be able to see the TRACE log messages.
5.2 Using One Properties File for All Profiles
Alternatively, you can declare the same configuration as above in one application.yml like this:
logging:
  level.org.springframework.core: INFO
---
spring:
  config:
    activate:
      on-profile: dev
logging:
  level.org.springframework.core: TRACE
As you can observe, we use the --- to separate our profiles and then the property activate.on-profile which dictates on which profile these properties will be applied.
6. Retrieving the Default and Currently Active Spring Boot Profiles
You can retrieve the default and the currently active profiles either on the main method as shown below:
String[] defaultProfiles = ctx.getEnvironment().getDefaultProfiles();
String[] activeProfiles = ctx.getEnvironment().getActiveProfiles();
Or in any other class by taking advantage of Environment bean that can be autowired:
package com.codelearnhub.springBootProfiles;
import org.springframework.core.env.Environment;
import org.springframework.stereotype.Component;
@Component
public class RetrieveProfiles {
    Environment environment;
    public RetrieveProfiles(Environment environment){
        this.environment = environment;
        String[] defaultProfiles = environment.getDefaultProfiles();
        String[] activeProfiles = environment.getActiveProfiles();
    }
}
Or by using @Value annotation, you can directly retrieve the spring.profiles.active property from application.yml as shown below:
public RetrieveProfiles(
        @Value("${spring.profiles.active}") String activeProfiles
) {}
7. Conclusion
By now, you should know how to retrieve and activate Spring Boot Profiles. Furthermore, you should be able to override properties for each profile that you may have. You find the source code on our GitHub page.